Noticias

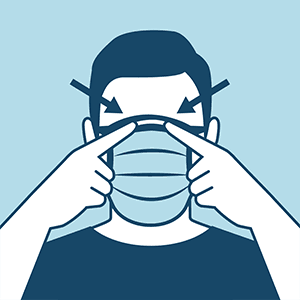
Cómo usar una cubierta de tela para la cara

Side view of an individual wearing a cloth face covering, which conceals their mouth and nose areas and has a string looped behind the visible ear to hold the covering in place. The top of the covering is positioned just below the eyes and the bottom extends down to cover the chin. The visible side of the covering extends to cover approximately half of the individual’s cheek.

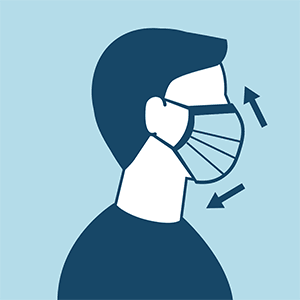
Las cubiertas de tela para cara deben:

  • ajustarse de manera firme pero cómoda contra los lados de la cara
  • asegurarse a las orejas con algún tipo de lazo
  • incluir varias capas de tela
  • permitir respirar sin restricción
  • poder lavarse y secarse en secadora sin sufrir daños ni deformarse

Recomendaciones de los CDC sobre las cubiertas de tela para la cara hechas en casa

Los CDC recomiendan usar cubiertas de tela para cara en entornos públicos donde sea difícil mantener otras medidas de distanciamiento social (p. ej., tiendas de comestibles y farmacias), especialmente en áreas de transmisión significativa en la comunidad.

Los CDC también recomiendan el uso de cubiertas de tela para cara simples para desacelerar la propagación del virus y evitar que quienes puedan tener el virus sin saberlo lo transmitan a otras personas.  Las Cubiertas de tela para cara confeccionadas con artículos del hogar o hechas en casa a partir de materiales comunes de bajo costo pueden usarse como medida adicional y voluntaria de salud pública.

Las cubiertas de tela para cara no se deberían usar en niños menores de 2 años ni en personas con problemas respiratorios o que estén inconscientes, incapacitadas o no sean capaces de quitárselas sin ayuda.

Las cubiertas de tela para cara recomendadas no son mascarillas quirúrgicas ni mascarillas de respiración N-95.  Esos son suministros críticos que se deben continuar reservando para los trabajadores de la salud y otros miembros del personal médico de respuesta a emergencias, como lo recomienda la guía actual de los CDC.

Frontal view of an individual wearing a cloth face covering. Individual is using two fingers to point to either side of the top of the nose, indicating that the covering fits well in this area.

¿Las cubiertas de tela para cara deben lavarse o limpiarse de alguna manera con regularidad? ¿Con qué frecuencia?

Sí. Se las debe lavar rutinariamente según la frecuencia de uso.

¿Cómo se deben esterilizar/limpiar de manera segura las cubiertas de tela para la cara?

Lavar las mascarillas caseras de tela en la lavadora es suficiente.

¿Cómo se debe retirar de manera segura una cubierta de tela para la cara usada?

Las personas deben tener cuidado de no tocarse los ojos, la nariz y la boca al quitarse su mascarilla casera, y lavarse las manos de inmediato luego de sacársela.

Instrucciones con y sin costuras

cubierta de tela para la cara cosida
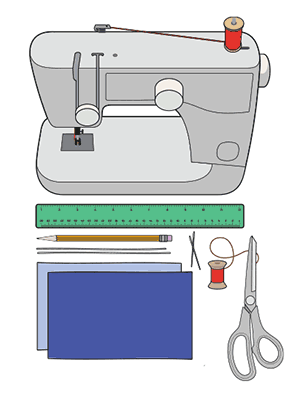
Supplies needed to create a cloth face covering are displayed. The supplies pictured include: one sewing machine, one twelve-inch ruler, one pencil, two six inch pieces of elastic string, two rectangle pieces of cotton cloth, 1 sewing needle, 1 bobby pin, 1 spool of thread, and 1 pair of scissors.

Materiales

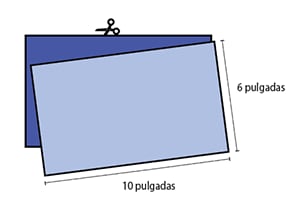
  • Dos rectángulos de 10″ x 6″ de tela de algodón
  • Dos trozos de elástico de 6″ (o bandas de goma, cuerdas, tiras de tela o sujetadores para el cabello)
  • Aguja e hilo (u horquilla para el cabello)
  • Tijeras
  • Máquina de coser

Tutorial

1. Corte dos rectángulos de 10 x 6 pulgadas de tela de algodón. Use algodón de trama cerrada, como telas acolchadas o sábanas de algodón. La tela de las camisetas funcionará sin problemas. Coloque un rectángulo sobre otro; deberá coser la mascarilla como si se tratara de una sola pieza de tela.

A close up of the two rectangular pieces of cloth needed to make a cloth face covering is shown. These pieces of cloth have been cut using a pair of scissors. Each piece of cloth measures ten inches in width and six inches in length.

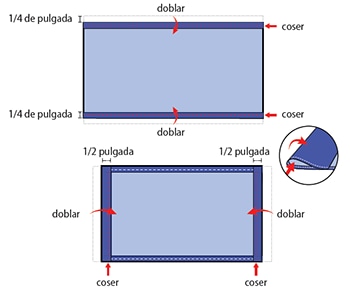
2. Doble los lados largos ¼ de pulgada y haga el dobladillo. Luego, pliegue la capa doble de tela ½ de pulgada en los lados cortos y cósala.

The top diagram shows the two rectangle cloth pieces stacked on top of each other, aligning on all sides. The rectangle, lying flat, is positioned so that the two ten inch sides are the top and the bottom of the rectangle, while the two six inch sides are the left and right side of the rectangle. The top diagram shows the two long edges of the cloth rectangle are folded over and stitched into place to create a one-fourth inch hem along the entire width of the top and bottom of the rectangle. The bottom diagram shows the two short edges of the cloth rectangle are folded over and stitched into place to create a one-half inch hem along the entire length of the right and left sides of the face covering.

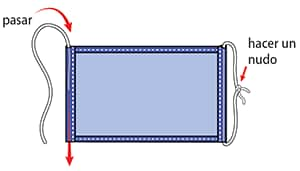
3. Pase un elástico de 6 pulgadas de largo por 1/8 pulgada de ancho por el dobladillo más ancho a cada lado de la mascarilla. Estos serán los sujetadores para las orejas. Use una aguja grande u horquilla para el cabello para enhebrarlos. Ate firmemente los extremos.
¿No tiene elástico? Use sujetadores para el cabello o bandas elásticas para la cabeza. Si solo tiene una cuerda, puede hacer los lazos más largos y atar la mascarilla detrás de la cabeza.

Two six inch pieces of elastic or string are threaded through the open one-half inch hems created on the left and right side of the rectangle. Then, the two ends of the elastic or string are tied together into a knot.

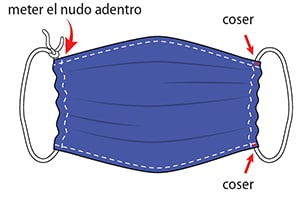
4. Tire suavemente del elástico para que los nudos queden dentro del dobladillo. Frunza los laterales de la mascarilla sobre el elástico y ajústelos para que la mascarilla se adapte a su rostro. Luego, cosa el elástico en su lugar para evitar que se deslice.

The diagram displays a completed face covering, in which the knots of the elastic strings are tucked inside the left and right hems of the mask and are no longer visible. The cloth is slightly gathered on its left and right sides, and additional stitching is added to the four corners of the gathered cloth rectangle, at the points where the cloth and the elastic or string overlap in these corners.

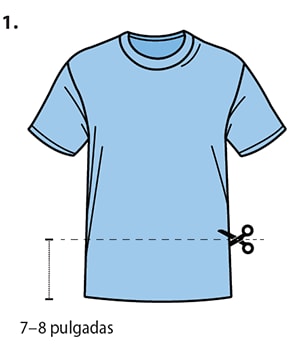
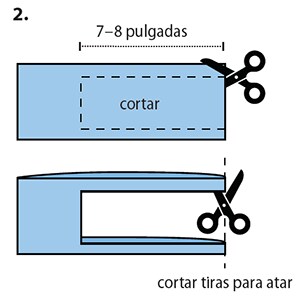
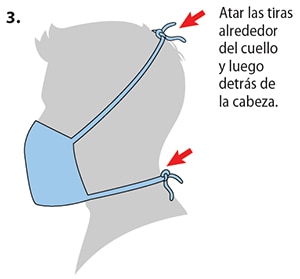
Mascarilla rápida con camiseta (método sin costuras)

Materiales

  • Camiseta
  • Tijeras

Tutorial

A front view of a T-shirt is shown. A straight, horizontal line is cut across the entire width of the T-shirt, parallel to the T-shirt’s waistline. Using a pair of scissors, the cut is made approximately seven to eight inches above the waistline. Both the front and back layer of the T-shirt are cut simultaneously.
The rectangle piece of cloth that has been cut from the bottom portion of the T-shirt is shown, lying flat. The rectangle is positioned so that the cut that was just made across the entire width of the shirt is the top side of the rectangle while the original waistline of the T-shirt is the bottom side of the rectangle. From the top right-hand corner of the rectangle, the scissors are moved down approximately one-half inch, along the right, hemmed side of the rectangle. From this point, a six to seven-inch, horizontal cut is made through both the front and back side of the cloth, parallel to the top of the rectangle. The scissors then turn ninety-degrees to cut downward, a vertical line that is parallel to the left side of the rectangle; this cut continues downward until it reaches approximately one-half inch above the bottom of the rectangle. The scissors then turn ninety-degrees again to create another six to seven-inch, horizontal cut that runs parallel to the bottom of the rectangle, back towards the right, hemmed side of the shirt, and cuts through the right, hemmed side of the rectangle. This newly cut out piece of cloth is laid to the side. To cut tie strings, the two remaining slivers of the right side of the rectangle are cut vertically along the hem.
The final piece of cloth is unfolded and worn by an individual. The middle of the cloth piece is positioned to cover the nose and mouth area. The four thin pieces of cloth act as tie strings to hold the cloth face covering in place. The strings around neck, then over top of head are tied into knots.

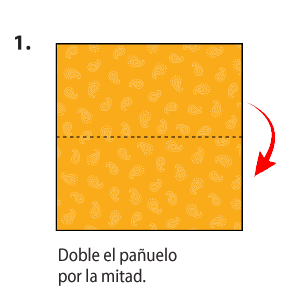
Mascarilla con pañuelo (método sin costuras)

Materiales

  • Pañuelo (tela cuadrada de algodón de 20″ x 20″ aproximadamente)
  • Filtro de café
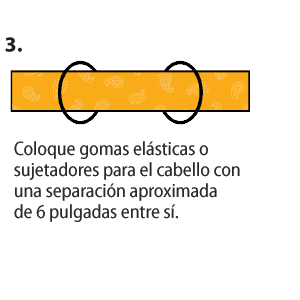
  • Bandas de goma (o sujetadores para el cabello)
  • Tijera (si cortará su propia tela)
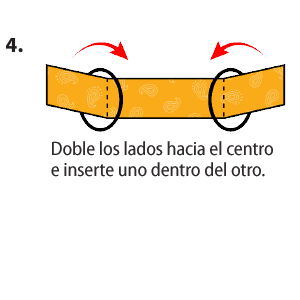
Tutorial

A single coffee filter is shown lying flat, with the curved edge at the top. Cut coffee filter in half with a horizontal line.
The square bandanna is shown lying flat. The bandanna is then folded in half, bringing the top edge of the bandanna to meet the bottom edge of the bandanna.
The top half of the coffee filter, with the curved edge at the top, is placed in the center of the folded bandanna. Then, fold filter in center of folded bandanna. Fold top down. Fold bottom up, to cover the filter entirely.
Insert the folded bandana, with the filter inside, through the center of two rubber bands or hair ties. Place rubber bands or hair ties about 6 inches apart.
Take the left side and the right side of the bandanna and fold each side to the middle and tuck the sides into each other.
The bandanna should now be a continuous, cloth loop since the left and right sides have been tucked into each other.
Side view of an individual wearing the finished, cloth face covering. The rubber bands or hair ties have been looped around each ear. The folded bandana has been spread out and positioned to cover the nose and mouth areas of the face. The tucked portion of the bandana is not visible on the outside of the cloth face covering.

Fuente del contenido: cdc.gov